Showing posts with label SSIS. Show all posts

Thursday, March 27, 2014

SQL To check for a day of a month

Suppose,  You are asked to design a SSIS package which should run on every 'Friday' of the week except for Friday which falls on 1st day of the month. For example November 1, 2013. This day is Friday and first day of the month.  So in our case this package should not run.


Assumption: You have a table called Calendartable with calendarDate, calendarYearMonth column
Sample data should look like

20140101, 201401
20140102, 201401


Let's first write T-SQL code to find out if it Friday and FirstDay of the month.

declare 
 @RunDate date
, @RunDate_YearMonth varchar(6)
, @ProcessingDateForThisMonth date
, @ProcessPackage int = 0

set @RunDate = '11/01/2013'

select @RunDate_YearMonth = CalendarDate from Calendartable where CalendarDate = @RunDate 

Print @RunDate_YearMonth;


select @ProcessingDateForThisMonth = min(CalendarDate) from Calendartable
where CalendarYearMonthCode = @RunDate_YearMonth --same month as run date
and datename(dw, CalendarDate) = 'Friday'  --day is a Friday
and day(CalendarDate) > 1 --not the 1st day of the month

Print @ProcessingDateForThisMonth

if @RunDate = @ProcessingDateForThisMonth
begin
set @ProcessPackage = 1
end
else
begin
set @ProcessPackage = 0
end

print @ProcessPackage

This sql set the value of ProcessPackage to 0 or 1 depending upon the date and datename. It will set to value of 0 only when the day happen to be firstday of the month and its friday otherwise it will be always 0.

Put Execute SQL Task in your package and take the value as your output value.


Declare @Now Date, @dayofmonth int=0, @ProcessPackage int = 0
Set @Now = getdate()
Set @dayofmonth = day(@now)

IF (@dayofmonth = 1 and datename(dw,@now) = 'Friday')
Set @ProcessPackage = 0
ELSE
SET @ProcessPackage = 1
Select @ProcessPackage


At this point, you should be ready to execute rest of your package based on this value

Friday, February 28, 2014

SSIS: Script task to check for File Exsits or not and send email notification

Sometime within SSIS package, we have to check for a particular file. If the file exists, then we have to do whole
lot of Data Flow and transformations. So if this is the case, we should in first step check for file existence.
If file does not exists, we want to send a email notification to business user and let them know that the file is missing.

To do this, let's get started.

Step 1
======
First we need to define following variables.
varFileExists Boolean datatype default value False
varFullSourceFilePath string datatype value will be location of the file with fully qualified. So if your file
is some server (most cases, it should be something like this \\myserver.com\Sourcefolder\myfile.txt). In our sample
case we will point to C drive. C:\tmp\a.xlsx


Step 2
======

Let's drag and drop a script task to control flow and open it. Add varFullSourcePathFileName in ReadOnlyVariable and varFileExists in readwritevariables as shown in the picture below.


Now open script task in visual basic. You can also do this in C#. But for now let's do in Visual Basic 2008.

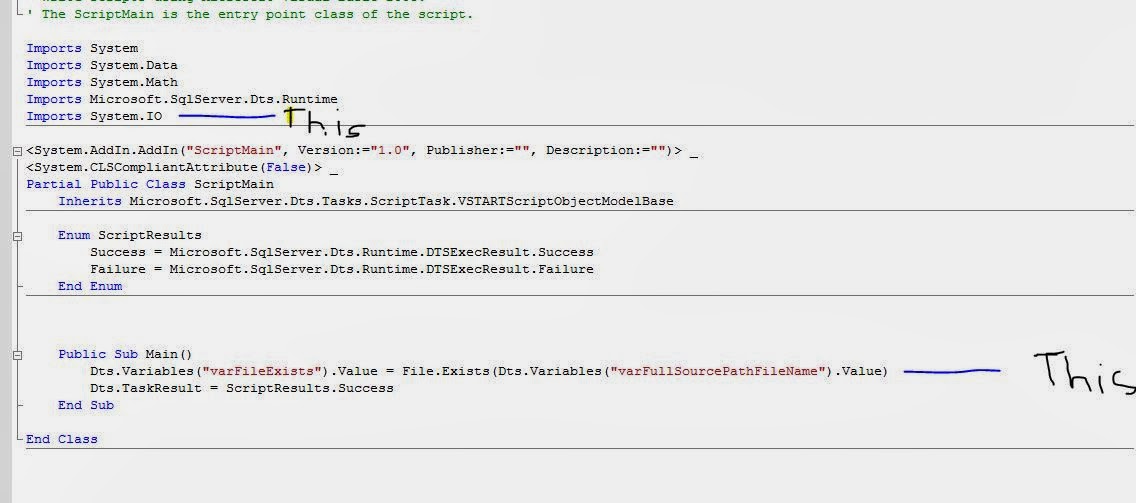
We need to add Imports System.IO and then write following code in Public Sub Main () routine.

Dts.Variables("varFileExists").Value = File.Exists(Dts.Variables("varFullSourcePathFileName").Value)

As shown in picture below.


Step 3
=====

Let's configure for send mail.

Add a data flow or sequence container to go to next step if File exists. If not send a mail. Here' we are interested in sending mail if file is missing.

So add a send mail task. connect script task to it. Change Evaluation Operation to Expression and Constraint. Value should be Success (be careful not to use Failure here) and in Expression write
@varFileExists==False.

This mean that file is missing and it will send mail notification.


And for your dataflow or sequence container, make @varFileExists==True and proceed.

Thursday, December 19, 2013

SSIS package validation while deploying to TEST or UAT or Production Server

Let's say you have created a great package in development environment and you have configured it and deployed on Test Server or UAT server. Now before you want Tester to know that package is out, You want to make sure that package would run as it was intended to do.

So How do we validate a SSIS package on a Test Server before it is being executed.

Let's dive in:

Step 1. Log on to your Test Integration Server and go to the package you want to validate.

Step 2. Right Click on the package and click Run Package.

Step 3. Go to Execution Options and check "Validate package without executing" option.

Step 4. Now Go to Command Line and click "Edit the command line Manually". In the command right at the end after /REPORTING V  add " > results.txt". Add your 32-bit execution path of package at the beginning.

C:\PROGRA~2\MICROS~1\100\DTS\Binn\dtexec.exe

So it will look like something this

C:\PROGRA~2\MICROS~1\100\DTS\Binn\dtexec.exe  /DTS "\DEV\mypackagename" /SERVER SERVERNAME /CHECKPOINTING OFF  /REPORTING V > results.txt

Step 5. Go to your command prompt where your server is install and paste the above text. And hit enter

Step 6. Type following " notepad results.txt" and hit enter

As soon as the validation is done, a notepad will open with the validation result.

At the end you will value 0 or 1. If it is 0, it mean that you package will execute without any metadata failure.
Remember that this is just validation. It won't check data in your databuffer or any other thing. It will just validate the package.

If you need more help on this one. Just leave a comment.


Tuesday, November 26, 2013

Slowly Changing Dimension and SSIS

Slowly Changing Dimension and SSIS

Concept: Slowly changing Dimension (SCD) is a concept in which data (columns) values changes over time due to change in business scenirio. Let's say we have a product with a price tag of $10 as of today date. Let's assume that the price of this product is increased by 10 percent tomorrow. So the new price will be $11. This is an example where data has changed and its called Slowly Changing Dimension.

Types of SCD: There are three type of SCD. Type 1, Type 2, and Type 3.

Type 1. In our example, we talked about price increase from $10 to $11. Let's see how we can make these changes in our database table to handle Type1 change.

Let's say we have a table called product.

ProductID ProductName ProductDescr Price DateAdded
1 iPhone Apple iPhone 1 10 01/01/2000

Now as the price of iPhone is increased from $10 to $11, all we have to do is update the price column. This is Type 1 SCD.

ProductID ProductName ProductDescr        Price         DateAdded
1 iPhone Apple iPhone 1       11 01/01/2000

To accomplish this, all you have to do is update the column and set with new price.

Let's take a look sql statement to do this.

Update product
Set Price = 11
Where ProductID = 1

Another way to do this:

Merger INTO TargetTable As Target
USING Sourcetable AS Source
ON Target.ProductID = Source.ProductID
When Matched THEN
Update
Set Price = Source.Price
When Not Matched THEN
INSERT
(ProductID, ProductName, ProductDescr, Price, DateAdd)
Values
(Source.ProductID, Source.ProductName, Source.ProductDescr, Source.DateAdd)

Type 2. Type 2 SCD is where we keep old record (row in this case) and add a new row. But before we do that, let's think for a moment, when we display, both rows will appear in our result. Inorder to accomplish type 2 SCD, we will make some changes to our table. We will add a new column called IsActive and RetiredDate. Also remember that when we build our product table, we kept ProductID as primary key. So when we add another row with the same productID, it's a primary key voliation. So we have to change our index by including ProductID and IsActive column as a clustered index.

With this we can add another row of data.

ProductID ProductName ProductDescr Price       DateAdded RetiredDate IsActive
1 iPhone Apple iPhone 1 10 01/01/2000 01/01/2013 0
1 iPhone Apple iPhone 1 11 01/02/2013 1

In this way, we can see how and when values has changed over time.

Type 3. In Type 3 SCD, instead of add a new row, we add a new column OLD PRICE and set this column to price and update price column to new value

ProductID ProductName ProductDescr Price OLD PRICE DateAdded
1 iPhone Apple iPhone 1 11 10 01/01/2000


However, as you can see that in Type 3 SCD, if we increase our price to $12 and update our data, it will look like this.

ProductID ProductName ProductDescr Price OLD PRICE DateAdded
1 iPhone Apple iPhone 1 12 11 01/01/2000

Now the old price is $11 which is actually last price and so the $10 price data is lost forever.

In real world, most company implement Type2 so that it can be used to reporting and analysis purpose.


This is work in Progress, I will be adding more information to this blog on SCD.

Friday, October 11, 2013

SSIS: script task to write to file and send as email attachment

Problem:

Create a package which read a query and save the result in file and send that file as an attachment.

Solution:

The problem says that we do a select query on some database, save the result to a file and send them as attachment. Or you asked to write to file and leave it there. This file can be picked by any other process. In this case, I am going to send the file as an attachment through email.

Designing the package:

This package will consists of three task:
1. Execute SQL Task
2.  Script Task
3. Send Mail Task

Variables:

Lets create all the variables needed for this package.

1. varResultSet: object type. This variable will hold the result of our execute SQL task.
2. varNewFileDelimiter: This variable is used as file delimiter which will be used in script task.
3. varUploadDirectoryPath: This variable is used to save my file created and hold values where I will be saving my file.
4.varMyResultFileName: This variable hold file name. Set Expression value to true and under expression add following.
@[User::varUploadDirectoryPath]+ "\\"+"MyResult"  + "_" + Right("0" + (DT_WSTR,2)MONTH(GETDATE()), 2) + Right("0" + (DT_WSTR,2)DAY(GETDATE()),2)  + (DT_WSTR,4)YEAR(GETDATE()) + ".csv"

Here I am saving my file as csv file with date added to file name.

5. varExceptionCount: This variable hold any exception counts.

Most of these variable will be used in script task and send mail task.

So lets go and add Execute SQL task to our package.

1. Execute SQL Task

Added connection manager which will be used. Right down your query in your sql statement and set ResultSet to Full Result Set.

Under Result set add the variable
Result Name = 0
Variable =varResultSet

This is all we have to do in the first task. Now if you execute this task, the result of your query will be held in this variable.

Let's add script task to consume this result and write to file.


2.  Script Task

In our script task, let's chose C# language and Under Read Only add following variables.

User::varResultSet,User::varMyResultFileName,User::varNewFileDelimiter

And In ReadWriteVariable, add User::varExceptionCount

Open your script task and add following code. Make sure that if you are using different variable name, change them at your end.

using System;
using System.Data;
using Microsoft.SqlServer.Dts.Runtime;
using System.Windows.Forms;
using System.Data.OleDb;  
using System.IO;
using System.Reflection;

namespace ST_7cdb67cf97304adab75a69c0b1d4688e.csproj
{
    [System.AddIn.AddIn("ScriptMain", Version = "1.0", Publisher = "", Description = "")]
    public partial class ScriptMain : Microsoft.SqlServer.Dts.Tasks.ScriptTask.VSTARTScriptObjectModelBase
    {

        #region VSTA generated code
        enum ScriptResults
        {
            Success = Microsoft.SqlServer.Dts.Runtime.DTSExecResult.Success,
            Failure = Microsoft.SqlServer.Dts.Runtime.DTSExecResult.Failure
        };
        #endregion


        public void Main()
        {
            try
            {
                OleDbDataAdapter A = new OleDbDataAdapter();
                System.Data.DataTable dt = new System.Data.DataTable();
                A.Fill(dt, Dts.Variables["User::varResultSet"].Value);
                string filepath = Dts.Variables["User::varMyResultFileName"].Value.ToString();
               
                int i = 0;

                Dts.Variables["User::varExceptionCount"].Value = dt.Rows.Count;

                if (dt.Rows.Count > 0)

                {
                    StreamWriter sw = null;

                    sw = new StreamWriter(filepath, false);

                    for (i = 0; i <dt.Columns.Count; i++)
                        {
                   
                            if (i == dt.Columns.Count -1)
                        {
                            sw.Write(dt.Columns[i].ToString());
                        }
                    else
                        {
                            sw.Write(dt.Columns[i].ToString()+Dts.Variables["User::varNewFileDelimiter"].Value.ToString());
                        }
                    }
               sw.WriteLine();

                    foreach (DataRow row in dt.Rows)
                    {
                        object[] array = row.ItemArray;

                        for (i = 0; i < array.Length; i++)
                        {
                            if (i == array.Length - 1)
                            {
                                sw.Write(array[i].ToString());
                            }
                            else
                            {
                                sw.Write(array[i].ToString() + Dts.Variables["User::varNewFileDelimiter"].Value.ToString());
                            }
                        }
                        sw.WriteLine();
                    }
                    sw.Close();

            }
                    }
                        catch (Exception ex)
                        {
                         }
                 }
    }
}
       

Save this. Now if you run your package, you find your file in the folder.

3. Send Mail Task

Add a send mail task, add your connection manage, add email id where you want to send. In expression, select FileAttachment and set it your variable (in this case @[User::vvarMyResultFileName]

You are all set to send this to as attachment.


Thursday, September 12, 2013

SSIS: File System Task to rename File

SSIS: File System Task to rename File

Assignment: You are give a task where you have some files--> *.csv, *.txt, or any other file. You are asked to rename the files and move to same folder or different folder.  How would you do this.

Lets look at what we are asked to do.

1. We have a Source Folder where we have files of a particular type. So we need to know the location of this folder. Lets create a variable called SourceFolder of string type and save location into this folder. let's assume that this is C:\temp\SourceFolder

2. We need to rename these files and save it in same folder location or different folder location and change name of these files. So let's create another variable and call them DestinationFolder of string type and save the location in value.

3. Now we need to pull each file in SourceFolder and put in them in Destination folder. Lets create a variable called FileName of string type and leave value blank.  Also create two more variables called FullSourceFolderFileName and FullDestinationFolderFileName. FullSourceFolderName value would be @SourceFolder + @FileName and FullDestinationFolderFileName value would be @DestinationFolder + @FileName. The reason for creating these two variable is to be used at run time to dynamically use them in Foreach Loop Container.

So far we have following variable in our package

VariableName             type              Value
1.FullName                   string            No value --- leave this blank
2.SourceFolder             string            C:\temp\SourceFolder
3.DestinationFolder       string            C:\temp\SourceFolder or C:\temp\DestinationFolder (you can dump renamed file in same source folder or dump into destination folder)
4. FullSourceFolderName string    set expression to true and in expression put @SourceFolder + @FileName
5. FullDestinationFolderFileName string   @DestinationFolder + @FileName same for this as you did for variable 4.

Now let's drop Foreach Loop in our package and configure it.

Go to variable Mapping and add FileName

Now drop file system task and configure as show in figure below.


Now you are good to run the package.

Wednesday, July 24, 2013

SSIS: How to count number of files in a folder and then perform task to insert into database.

Question: I want to count number of files in my source folder. If there are files in my source folder, I want to insert data in my table, if not I want to send an email alert that no file was found (This is just the beginning to complicate this requirement but let's begin with this simple task and we will go to make this more complicated later)

Solution:

Step 1: Let's create some variables and use them for this task.

varSourceFolder string C:\tmp
FileCount int 0


Step 2: Open a script task in Control Flow and rename it to "Check for Files" and copy and paste this script.

'****************************************************************************************************************
' Microsoft SQL Server Integration Services Script Task
' Write scripts using Microsoft Visual Basic 2008.
' The ScriptMain is the entry point class of the script.

Imports System
Imports System.Data
Imports System.Math
Imports Microsoft.SqlServer.Dts.Runtime
'Add these to system to your script
Imports System.IO
Imports System.IO.Directory

<System.AddIn.AddIn("ScriptMain", Version:="1.0", Publisher:="", Description:="")> _
<System.CLSCompliantAttribute(False)> _
Partial Public Class ScriptMain
Inherits Microsoft.SqlServer.Dts.Tasks.ScriptTask.VSTARTScriptObjectModelBase


    'Declare FileCount as Global Variable where we will store value of number of files in our source folder
    Dim FileCount As Int32
Enum ScriptResults
Success = Microsoft.SqlServer.Dts.Runtime.DTSExecResult.Success
Failure = Microsoft.SqlServer.Dts.Runtime.DTSExecResult.Failure
End Enum


' The execution engine calls this method when the task executes.
' To access the object model, use the Dts property. Connections, variables, events,
' and logging features are available as members of the Dts property as shown in the following examples.
'
' To reference a variable, call Dts.Variables("MyCaseSensitiveVariableName").Value
' To post a log entry, call Dts.Log("This is my log text", 999, Nothing)
' To fire an event, call Dts.Events.FireInformation(99, "test", "hit the help message", "", 0, True)
'
' To use the connections collection use something like the following:
' ConnectionManager cm = Dts.Connections.Add("OLEDB")
' cm.ConnectionString = "Data Source=localhost;Initial Catalog=AdventureWorks;Provider=SQLNCLI10;Integrated Security=SSPI;Auto Translate=False;"
'
' Before returning from this method, set the value of Dts.TaskResult to indicate success or failure.
'
' To open Help, press F1.

Public Sub Main()
'
' Add your code here
        '
        'foldername is declared as string variable and it look in varSourceFolder place to find all our files.
        Dim foldername As String = Dts.Variables("User::varSourceFolder").Value
        ' dirs get all the files based on .csv file type in our varSourceFolder location.
        Dim dirs As String() = System.IO.Directory.GetFiles(foldername, "*.csv")
        'This count all the file and save it fileCount variable which we declared at global label.
        FileCount = dirs.Length
        'MessageBox.Show(FileCount) show number of file in our folder. This is done during development. Once you are done with this, you can comment out or remove for your script.
        MessageBox.Show(FileCount)
        ' Finally we write the FileCount to our variable which we can access outside this script task.
        Dts.Variables("User::FileCount").Value = FileCount

Dts.TaskResult = ScriptResults.Success
End Sub

End Class
'****************************************************************************************************************

Step 3: Send a mail if there is no file in our source folder.

Drag a send mail task and connect to scrip task.
Double click connector to edit it.
Under Constraint option,  choose expression as Evalution operation.
Then under Expression write
@FileCount ==0 and test the connection. Remember this is the out variable from script task where we are saving file count.
Configure your send mail according to your smtp server and email from and to and message body.


Step 4: Drag and drop Foreach Loop container to your control flow. Configure your Foreach Loop. ( make sure you use expression for directory and file spec!!! it save life later on)

Step 5. Drag and Drop data flow task inside Foreach Loop and configure it according to your need.


Happy Hunting in SSIS.